Site Management and Publishing
Dreamweaver's Site Editor provides a convenient way to move copies of files from a local disk to your web server. (grace.rit.edu) To Access the Site Editor: In Dreamweaver, Choose Window > Site Files or Site Menu.
It serves as a built in FTP (File Transfer) program. The publishing process of moving web files to web is conducted as follows each time you make updates to your web site on your local disk.
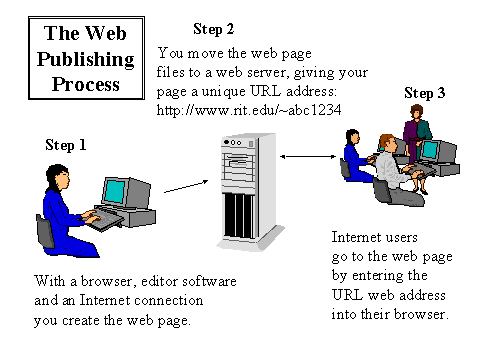
Complete the following steps to publish your web site on grace.rit.edu.
Step 1: One time only step: Set up your DCE account on grace.rit.edu to make it world readable for web pages before you (move files to the web)
Get a DCE account
If you have an account login to ritvax.rit.edu, you can use the same DCE username and password to login to the grace.rit.edu computer from which RIT web pages are served. If you have never used the change your password at http://www.rit.edu/~750www/DCE/
RIT organizational webpages get an official DCE organizational grace account at ITS Helpdesk. It will begin ###www where ### is the numerical department code or an alpha/numeric organization/affiliation code Do not use your personal DCE account for an organizational page. People in your organization could graduate or change.
Personal pages should be placed on personal DCE account are available at the ITS Helpdesk for RIT students, faculty and staff. Students can also get accounts at the RIT Library Reference Desk.
Set up permissions on your web site:
Prevent the "forbidden" message from appearing instead of your web page!
One Time Required Step: Set up your DCE account on grace.rit.edu
Run a Telnet application to connect to grace.rit.edu (Open connection > Host: grace.rit.edu) On a PC, Choose Run> Telnet from the Start menu or use designated telnet client. On a Mac, use Better Telnet. (available on the web by download.)
Make web directory in your account called www. by typing the following lower-case command at the %.
mkdir www
Set permissions on the account by typing the following at the %
ofw
A prompt will be returned: This will open your account for WEB access Is this what you want to do? [y,n]Answer yes by typing the letter y
Type exit at % to logout.
Answers to Frequently Asked Questions About Setting Permissions
1. What if I type ofw and no prompt is returned? Type /usr/local/bin/ofw at the %.
2. How do you telnet? Get a telnet application from a software download site on the web such as http://www.share.com or http://www.download .com or go to an ITS lab, library VIA (2nd floor) or ITS Helpdesk for assistance.
OR
If you know how to, connect to the ritvax.rit.edu Type the q key to quit the RITmenu and type telnet grace.rit.edu from the $.
Note: If you have already set your site up, choose Window > Site Files for the overview of your site and for options to publish your site to the web and skip this section to Connecting and Publishing on grace.rit.edu.
Setting Up the Site in Dreamweaver:
Step 2:
1. On a PC: Open Dreamweaver from the Start Menu if it is not already open.
Select Site > Define Sites
Click New button.
1. On a Macintosh: Double click your Dreamweaver icon to open the program, if it is not already open.
Select Site > Open Site> Define Sites
2. Select (Category Local Info). For the Site Name: Fill in a name to refer to later (i.e. course, home page)
3. Local Root Folder: Click the yellow folder icon and browse to the location of the www folder that holds your web site files.
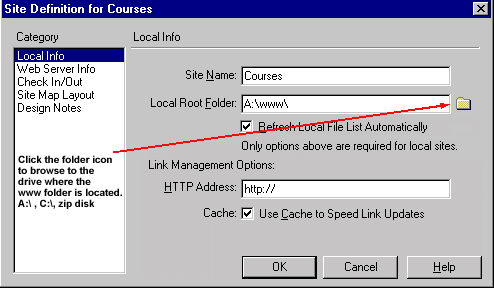
Step 3: Choose Category: Web Server Info
From the drop down menu, select FTP.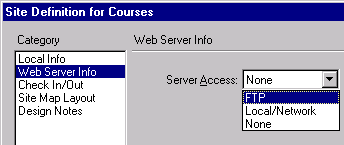
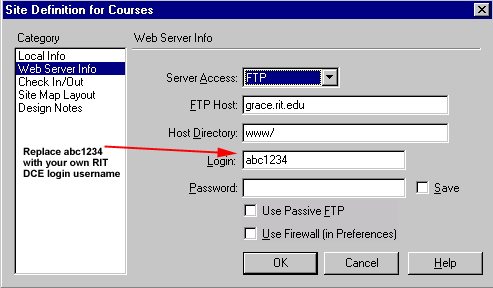
Fill in the FTP info required:
FTP Host: grace.rit.edu
Host Directory: www/
Login: your personal RIT DCE Username
Click OK. A Site Window will appear. This is a view of everything that is in the Site Local folder and remote site (grace.rit.edu) when you are ready to move (FTP) finished files to the web server.
Step 4: Last check:
____ All of your information for your web site should be in your site folder.
____The lead web page document in each directory is index.html
____All other web pages in the site are linked to index.html to make them accessible, just as chapters in a book are listed in a table of contents.
____Name all other connection web pages with a short lower-case name, (no spaces or special characters) ending in the .html extension. i.e. resume.html, syllabus.html, assign1.html
____All image files are saved as gif or jpeg and have extensions of .jpg or .gif. i.e. picture.jpg, logo.gif
___Files have been proofed and spell checked. (If not, double click the file in the Local Site View and choose Text > Check spelling and File > Save.
___All links connect correctly.(File > Preview in Browser, select Web Browser and click through them all. Site > Check Links Sitewide
___Site has been checked for accessibility.
ALT tags for all images.
File> Check Target Browsers to see that everything is backward compatible.
___ Files meet RIT guidelines and policies. http://www.rit.edu/its
___All content is original, royalty free for the web or has secured written copyright permission to use on the site.
___No confidential information is being collected in an unencrypted environment.(SS#, credit card information, etc.)
___All other file extensions are correct
other media have correct extensions. (i.e. acrobat files end in .pdf
all server-side include documents end in .shtml
powerpoint .ppt
excel .xls
word .doc
Notes: Each time you switch to a different computer you will need to re-set your site editor if you wish to publish from that computer.
Connecting and Publishing to grace.rit.edu
Click the Connect button. The local directory with your files will appear on the right
Your Remote directory (view of your grace.rit.edu account www directory) will appear on the left.
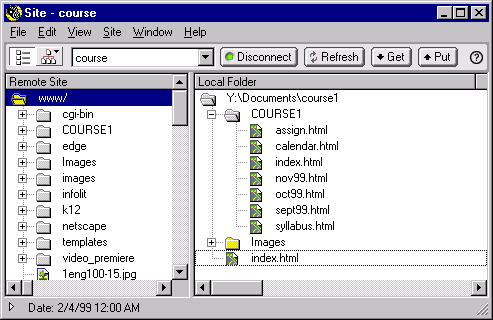
Click and drag each of the files, index.html (your lead document) and other affiliated files (image file:.gif and .jpg or other html files), from the Right www directory (local view) to the www directory on the left. (remote view). The www directory on the remote view should be highlighted when you drag the files on top of it.
You may also highlight complete folders or files you wish to transfer and drag them over. (Alternatively, highlight the files and click the Put button.)
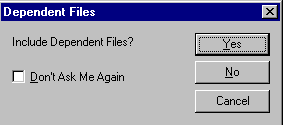
Click Yes for Dependent Files to move all files associated with your web site to your account space on grace.rit.edu. Click No if you do not want attached files moved.
Dragging files from the remote directory to the local directory will make copies of the files on your disk. (Alternatively, Get will get copies of highlighted files from grace.rit.edu to your hard drive or disk.
Congratulations: You have a real web site address!
Files will be transferred to your account space on grace.rit.edu.
The web address (URL) to reach them in Netscape will be
http://www.rit.edu/~abc1234 (where abc1234 is replaced by your username )
Notes:
Refreshing the View of the Site Window: Click the Refresh button.
At a later date:
To Re-edit Site Information: Site > Open Site> Define Sites.
Click the Edit button with the name of site highlighted
To Access Site Editor: In Dreamweaver, Choose Window > Site Files in Dreamweaver. |


